Passwords, account addresses and server addresses in this report have been removed, covered or replaced with placeholders.
This is my technical report comparing Amazon Web Services (AWS) and Google Cloud Platform (GCP) for hosting a WordPress website using the LAMP stack — Linux, Apache, MySQL, and PHP. The report covers key service offerings, cost model differences, step-by-step deployment procedures on both platforms, improvement suggestions, and a platform comparison.
Introduction
Cloud computing is an on-demand, pay-as-you-go model for accessing computing resources — storage, network, servers, and virtual machines — provided by cloud service providers like Amazon, Google, and Microsoft, managed and operated via the internet.
In this report, I compare AWS and GCP on their key service offerings and cost models, then document the full procedure for installing a WordPress website with a LAMP stack server on both platforms. I also discuss improvement suggestions and the concepts of virtualisation and elasticity as implemented on each platform.
Background
Cloud computing uses computing resources via the internet on rent from providers like Amazon, Google, and Microsoft. Key features include scalability, security, easy maintainability, cost-effectiveness, and improved reliability. Cloud services are available in four deployment models (public, private, hybrid, community) and three service models:
- SaaS — Software as a Service
- PaaS — Platform as a Service
- IaaS — Infrastructure as a Service
This report focuses specifically on AWS Elastic Compute Cloud (EC2) and GCP Compute Engine (VM) — the services used to deploy the WordPress site.
Key Service Offerings
Amazon Web Services — EC2
AWS EC2 provides a virtual environment accessible continuously from anywhere via the internet — with facilities like CPU/GPU processing, RAM, SSD storage, database, server, and networking, without requiring physical hardware. Key service categories include:
- Storage — files, blocks, disaster recovery, backups, archiving
- Compute — virtual servers (EC2 instances)
- Infrastructure — server automation, monitoring, logging, cloud deployment, and management
- Networking — VPC, load balancing, DNS, CDN
For this project, I used AWS EC2 instances to create a virtual environment, installed the LAMP stack, and connected a WordPress website to the server.
Google Cloud Platform — Compute Engine
GCP is a dominant Platform as a Service provider offering powerful cloud security and virtual machines for creating instances. Key offerings include:
- Compute Engine — virtual machines (used in this project)
- Cloud Storage — object and block storage
- Networking — load balancing, CDN, VPC
- Serverless — Cloud Functions, Cloud Run
- Developer Tools — Cloud Shell, Cloud Build, artifact registry
Cost Model Comparison
AWS EC2 and GCP Compute Engine each offer multiple pricing models targeting different workload types:
| Pricing Model | AWS EC2 | GCP Compute Engine |
|---|---|---|
| On-Demand | Billed per second, no upfront commitment. Most flexible but most expensive. | Billed per second (1-minute minimum), no upfront commitment. Similar to AWS On-Demand. |
| Committed / Reserved | Reserved Instances — up to 75% savings with a 1- or 3-year commitment. Ideal for steady-state workloads. | Committed Use Contracts — up to 57% discount for committing to specific vCPU/memory for 1 or 3 years. |
| Interruptible / Spot | Spot Instances — up to 90% discount using unused EC2 capacity. Can be interrupted when AWS needs capacity back. | Preemptible VMs — up to 80% savings. Short-lived; GCP can terminate at any time. Ideal for batch and fault-tolerant workloads. |
AWS charges hourly with a free tier for the first year. GCP charges per minute or per second with pay-as-you-go flexibility. For long-running production workloads, AWS Reserved Instances offer deeper discounts; for flexible short-term workloads, GCP's pricing model is more competitive.
Procedure: AWS EC2 Instance Setup
To create the EC2 instance on AWS, I logged into my AWS account and searched for EC2 in the console. I created an instance named WordPress, selected Ubuntu 22.04 LTS, configured 20 GB of gp2 storage, and ensured the security group allowed inbound HTTP (port 80), HTTPS (port 443), and SSH (port 22) from anywhere.
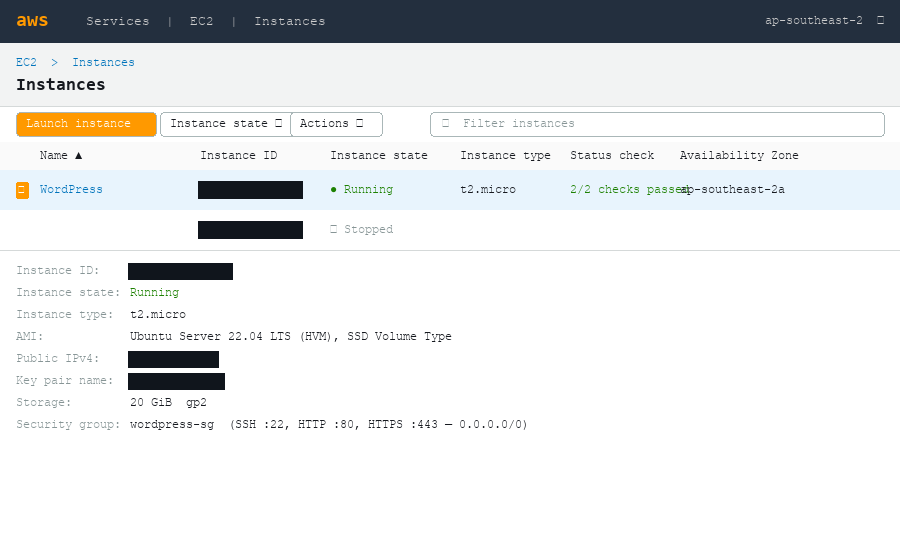
AWS EC2 Instances console — the WordPress instance is Running with public IPv4 203.0.113.10, Ubuntu 22.04 LTS, t2.micro, 20 GiB gp2 storage, security group allowing SSH/HTTP/HTTPS from 0.0.0.0/0
Procedure: GCP Compute Engine VM Setup
On Google Cloud Platform, I created an account, logged into the Console, and searched for Compute Engine → VM instances. I created a VM instance named wordpress, then connected to it via the browser-based SSH button in the GCP console.
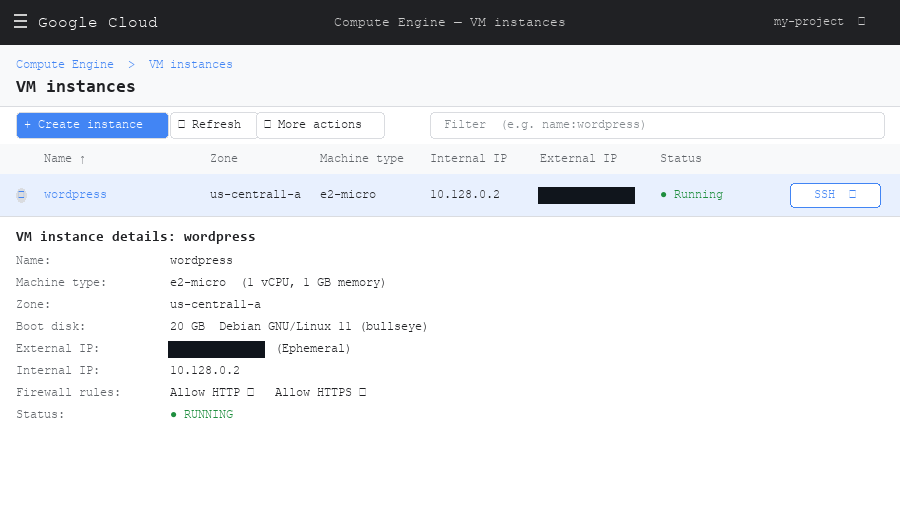
GCP Compute Engine VM instances — the wordpress VM is Running with external IP 203.0.113.20, e2-micro, 20 GB boot disk, HTTP and HTTPS firewall rules enabled. SSH button connects directly from the browser.
Step 1 — Switch to Root & Update the System
After connecting to the server via SSH, the first step on both platforms is to switch to root and fully update and upgrade the system packages:
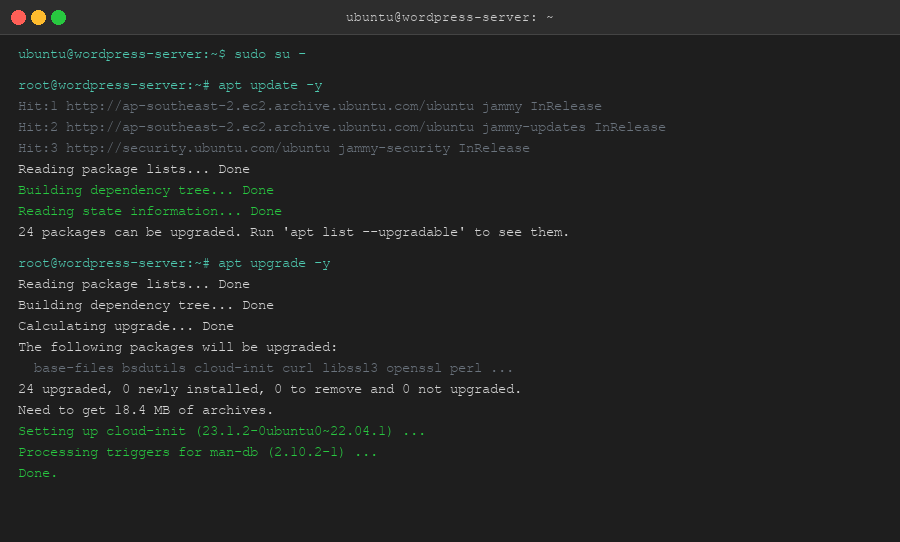
Switching to root with sudo su -, then running apt update -y and apt upgrade -y to bring all system packages up to date before installing the LAMP stack
sudo su -
apt update -y
apt upgrade -y
Step 2 — Install Apache2
Apache2 is the web server that will serve the WordPress site. Install it with:
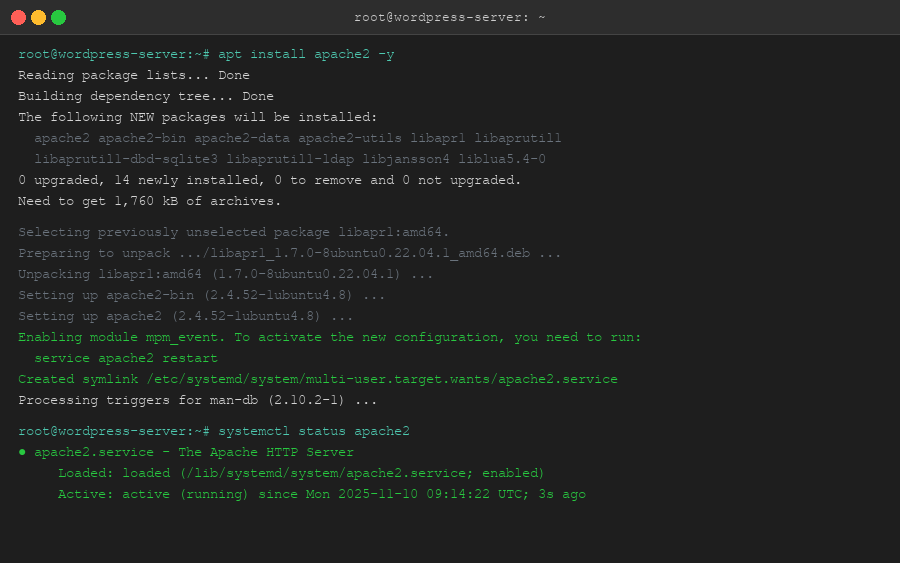
apt install apache2 -y installs the Apache HTTP server. The final check with systemctl status apache2 confirms the service is active and running.
apt install apache2 -yStep 3 — Install MariaDB
MariaDB is the database server used to store WordPress data. Install both the server and client packages:
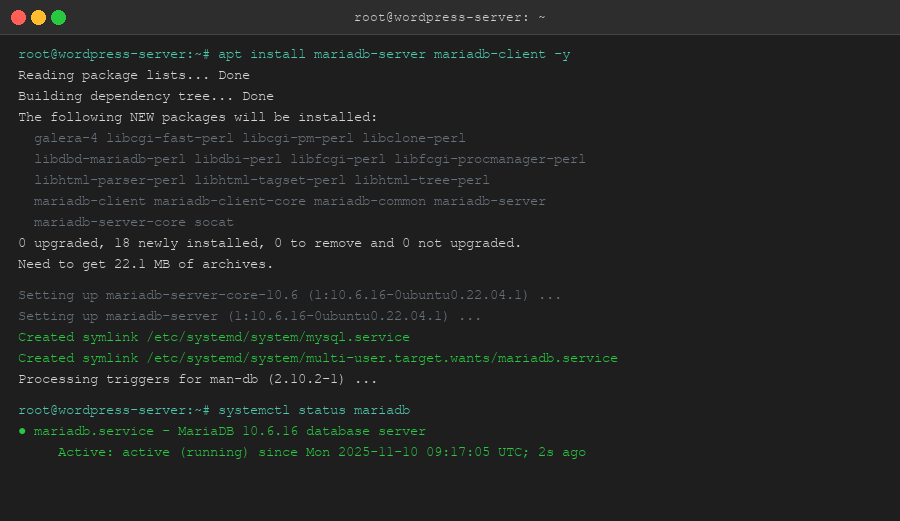
apt install mariadb-server mariadb-client -y installs MariaDB 10.6. Confirmed active with systemctl status mariadb.
apt install mariadb-server mariadb-client -yStep 4 — Secure MySQL
Run the MySQL secure installation script to set the root password and harden the database server:
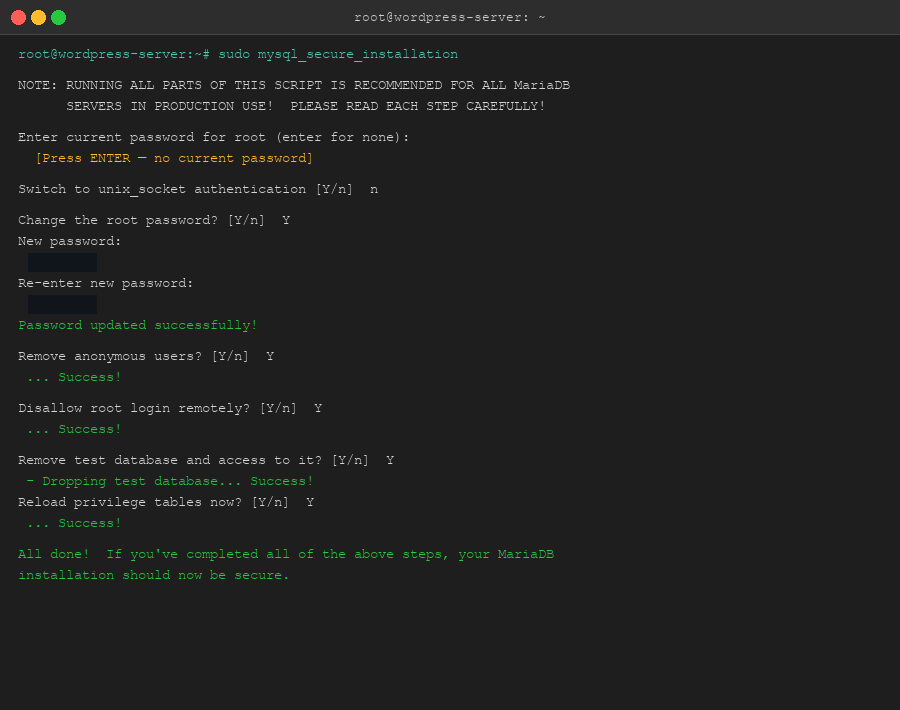
sudo mysql_secure_installation — press Enter for the current password (none), set new root password as your-strong-password, then answer Yes to all remaining prompts to remove anonymous users, disallow remote root login, remove the test database, and reload privilege tables.
sudo mysql_secure_installationWhen prompted: press Enter for the current root password, then set the new root password to your-strong-password. Answer Y to all remaining questions.
Step 5 — Install PHP
PHP is required for WordPress to run. Install PHP along with the MySQL and GD extensions:
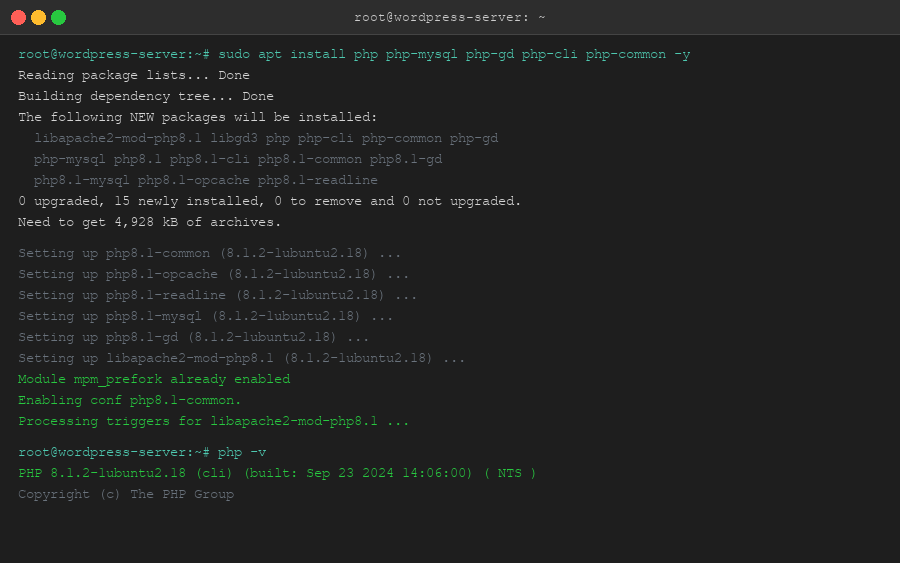
sudo apt install php php-mysql php-gd php-cli php-common -y installs PHP 8.1.2 with all required WordPress extensions. Verified with php -v.
sudo apt install php php-mysql php-gd php-cli php-common -yStep 6 — Download & Deploy WordPress
Restart MariaDB, then download the WordPress zip, extract it, and deploy the files to the Apache web root:
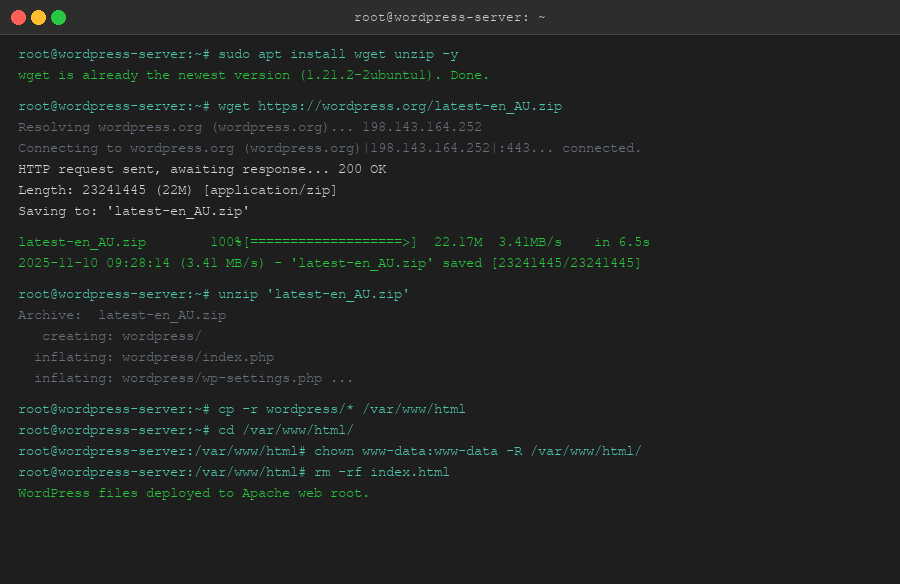
Downloading WordPress with wget, extracting with unzip, copying all files to /var/www/html, setting correct ownership with chown www-data, and removing the default Apache index.html
sudo apt install wget unzip
wget https://wordpress.org/latest-en_AU.zip
unzip 'latest-en_AU.zip'
cp -r wordpress/* /var/www/html
cd /var/www/html/
chown www-data:www-data -R /var/www/html/
rm -rf index.html
Step 7 — Configure the WordPress Database
Log into MariaDB and create the WordPress database, user, and grant permissions:
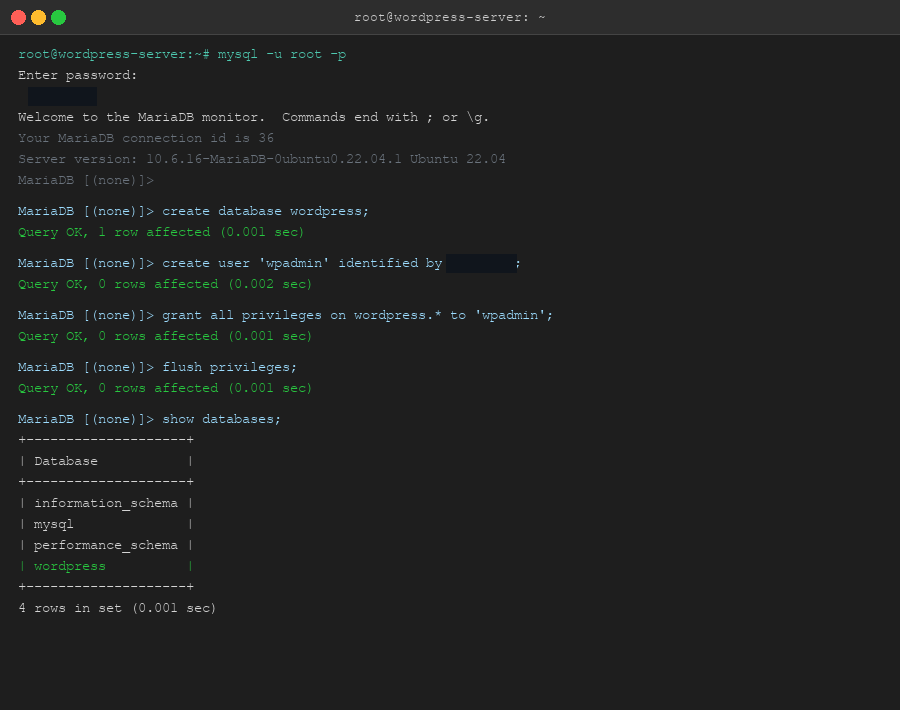
Logging into MariaDB with mysql -u root -p, creating the wordpress database, creating user wpadmin with password your-strong-password, and granting all privileges. The show databases query confirms the wordpress database exists.
mysql -u root -pAt the MariaDB prompt, run:
create database wordpress;
create user 'wpadmin' identified by 'your-strong-password';
grant all privileges on wordpress.* to 'wpadmin';
flush privileges;
Step 8 — Complete WordPress Setup in Browser
After setting up the database, refresh the browser using the server's public IP address. WordPress presents its installation wizard. Enter the database credentials to complete the setup.
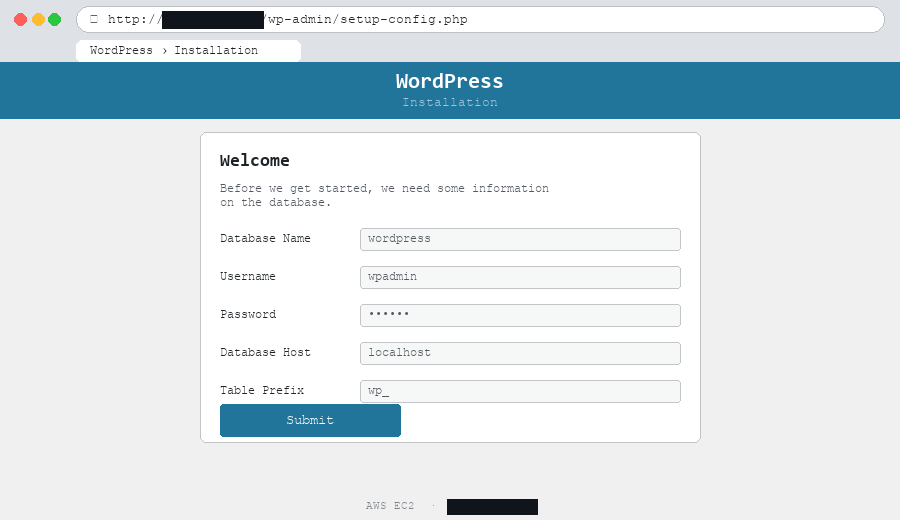
WordPress installation wizard at http://203.0.113.10/ (AWS EC2) — database name: wordpress, username: wpadmin, password: your-strong-password, host: localhost. Submit to finalise.
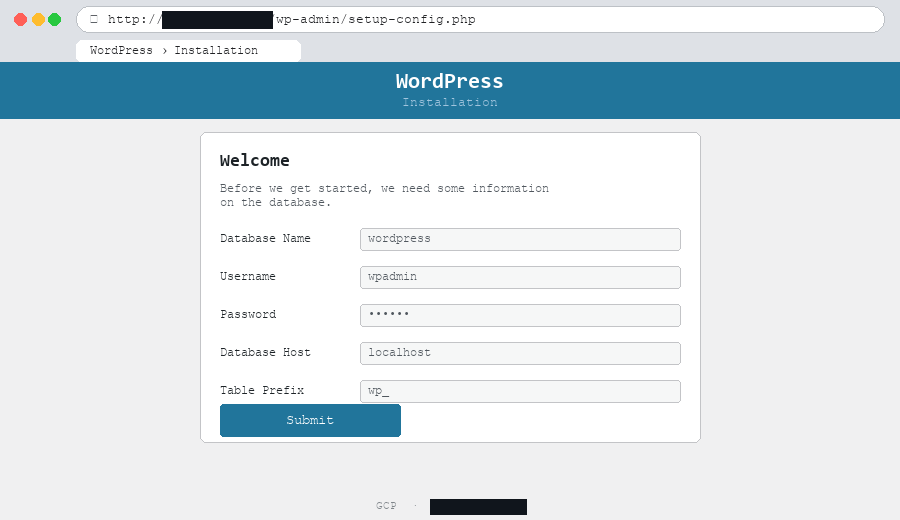
WordPress installation wizard at http://203.0.113.20/ (GCP Compute Engine) — same database credentials, same procedure. Both platforms reach a live WordPress site by the end of Step 8.
Improvement Suggestions
This deployment covers the basic LAMP stack setup. There is significant room to improve:
1. SSL Certificate & Custom Domain
Install an SSL certificate (Let's Encrypt via Certbot is free) to secure the site with HTTPS and move from an IP address to a branded domain name. Without SSL, browsers show a "Not Secure" warning — unacceptable for any production site.
2. Infrastructure Automation
Use AWS CloudFormation or GCP Cloud Deployment Manager to automate the LAMP stack deployment. This allows the entire environment to be rebuilt from a template in minutes — no manual steps, no configuration drift.
3. Load Balancing & Auto Scaling
Combine AWS Elastic Load Balancer (or GCP Cloud Load Balancing) with an Auto Scaling Group to distribute traffic across multiple instances and scale resources automatically during peak loads — preventing downtime under high traffic.
4. Automated Backups & Disaster Recovery
Configure automated backups of the WordPress database and files. Both platforms offer native snapshot capabilities; a scheduled backup policy protects against data loss from hardware failure, ransomware, or accidental deletion.
5. Monitoring & Alerting
Implement AWS CloudWatch or GCP Cloud Monitoring to gain real-time insights into server health, application errors, and performance metrics. Set up alerts so you're notified before issues impact users.
6. CI/CD Pipeline
Set up a CI/CD pipeline (AWS CodePipeline or GCP Cloud Build) to automate testing and deployment of WordPress theme/plugin updates — removing the risk of manual FTP uploads breaking the site.
Platform Comparison
| Criteria | AWS EC2 | GCP Compute Engine |
|---|---|---|
| Market position | Pioneer and global market leader in cloud services. Widest range of services and regions. | Strong in PaaS and developer tooling. Known for data analytics and ML capabilities. |
| Pricing | Hourly billing. Free tier for 12 months for new accounts. Reserved Instances save up to 75%. | Per-second billing. Committed Use saves up to 57%. Generally more affordable for sustained use. |
| Service breadth | 200+ services across compute, storage, database, networking, AI/ML, security, and more. | Comprehensive but narrower. Strongest in compute, Kubernetes (GKE), BigQuery, and Vertex AI. |
| Security | World-class security teams and compliance certifications. IAM, Security Hub, GuardDuty. | 500+ dedicated security engineers. BeyondCorp zero-trust model, strong data encryption. |
| Best for | Large enterprises requiring maximum flexibility, global reach, and the widest service ecosystem. | Organisations prioritising cost, Kubernetes workloads, data analytics, or Google Workspace integration. |
Virtualisation & Elasticity
This project directly demonstrates two core cloud concepts:
Virtualisation
By using AWS EC2 instances and GCP virtual machines, I experienced virtualisation first-hand — accessing a server via the internet with command-line control over a full computing environment, without owning any physical hardware. Benefits realised in this project:
- No hardware cost — no server to buy, rack, or maintain
- Resource efficiency — the cloud provider manages the underlying physical infrastructure
- Portability — the same Ubuntu + LAMP setup runs identically on AWS and GCP
- Isolation — each VM has its own OS, applications, and network interface
Elasticity
Elasticity refers to the ability to scale resources up and down based on demand, automatically adjusting to match load and optimising performance during peak hours. Although this basic deployment uses fixed t2.micro / e2-micro instances, both platforms support:
- Vertical scaling — change instance type (more CPU/RAM) with a few clicks and a restart
- Horizontal scaling — Auto Scaling Groups (AWS) or Managed Instance Groups (GCP) add or remove instances automatically
- Cost efficiency — you pay only for what you use, scaling down overnight or on weekends
Conclusion
This project successfully deployed a WordPress website on both AWS EC2 and GCP Compute Engine using the LAMP stack. The same installation procedure — updating the system, installing Apache2, MariaDB, PHP, downloading WordPress, configuring the database, and completing the wizard — works on both platforms with no meaningful differences in the process.
From this project, I conclude:
- AWS is the most popular choice for organisations requiring the widest range of services, global infrastructure, and ecosystem flexibility. Most large enterprises use AWS as their primary cloud platform.
- GCP provides more affordability and focuses strongly on Platform as a Service, data analytics, and Kubernetes. It is the better choice when cost, Google Workspace integration, or ML workloads are the priority.
- Both platforms are capable of hosting production-grade WordPress sites — the choice depends on budget, specific feature requirements, and existing technology stack.
Although this deployment reflects basic WordPress hosting, both EC2 and Compute Engine have far greater potential — capable of solving complex business, corporate, and government problems with their full range of services.
References
- Gandhi, V. A., & Kumbharana, C. K. (2014). Comparative study of Amazon EC2 and Microsoft Azure cloud architecture. International Journal of Advanced Networking & Applications, 117–123.
- Mitra, A., O'Regan, N., & Sarpong, D. (2018). Cloud resource adaptation: A resource-based perspective on value creation for corporate growth. Technological Forecasting and Social Change, 130, 28–38.
- Díaz, M., Martín, C., & Rubio, B. (2016). State-of-the-art, challenges, and open issues in the integration of the Internet of Things and cloud computing. Journal of Network and Computer Applications, 67, 99–117.
- Kamal, M. A., Raza, H. W., Alam, M. M., & Mohd, M. (2020). Highlight the features of AWS, GCP and Microsoft Azure that have an impact when choosing a cloud service provider. Int. J. Recent Technol. Eng, 8(5), 4124–4232.
- Mary, A. A. & Chitra, K. (2017). Study on Disaster Recovery in Cloud Environment. In 2017 World Congress on Computing and Communication Technologies (WCCCT) (pp. 165–167). IEEE.